


I’ve hosted CS 1.6 servers since 2006 – from tiny 10-player LAN servers running on my old Pentium 4 to 32-player dedicated servers handling hundreds of connections daily. Hosting your own CS 1.6 server is easier than you think and gives you complete control over maps, mods, rules, and your community. Whether you want a private server for friends, a public server to build a community, or just want to learn server administration, I’m walking you through every step. Today I’m teaching you how to set up a CS 1.6 server from scratch – both Windows and Linux, basic and advanced configs, plugins, anti-cheat, and everything you need to run a successful server in 2025.
Table of Contents:
Server Requirements
What You Need
💻 Hardware Requirements
Minimum (10-player server):
- CPU: Dual-core 2.0 GHz
- RAM: 512 MB
- Storage: 2 GB
- Network: 10 Mbps upload
Recommended (32-player server):
- CPU: Quad-core 2.5+ GHz
- RAM: 2 GB
- Storage: 5 GB (more for custom content)
- Network: 50 Mbps upload
Reality check: CS 1.6 is OLD. Even a potato PC from 2010 can host a 20-player server. The bottleneck is usually upload speed, not hardware.
🌐 Hosting Options
1. Home PC / Spare Computer
- Cost: Free (electricity only)
- Pros: Full control, no monthly fees
- Cons: Home internet upload limitations, PC must run 24/7
- Best for: Private servers, LAN parties, testing
2. VPS (Virtual Private Server)
- Cost: $3-10/month
- Pros: 24/7 uptime, better network, professional
- Cons: Monthly cost, requires basic Linux knowledge
- Best for: Public servers, communities
- Recommended: DigitalOcean, Vultr, OVH
3. Dedicated Server
- Cost: $30-100/month
- Pros: Maximum performance, can host multiple servers
- Cons: Expensive for single CS 1.6 server
- Best for: Large communities, multiple game servers
4. Game Server Hosting
- Cost: $5-15/month
- Pros: Pre-configured, easy control panel, support
- Cons: Less control, overpriced for what you get
- Best for: Non-technical users who want simplicity
My recommendation: Home PC for private/testing, VPS for public server. VPS offers best value – $5/month gets you 24/7 reliable server.
Windows Server Setup
Step-by-Step Installation
📥 Step 1: Download SteamCMD
SteamCMD is the official tool to download/update game servers.
- Create folder:
C:\HLDS - Download SteamCMD: steamcmd.zip
- Extract to
C:\HLDS - Run
steamcmd.exe
First launch will update SteamCMD. Wait for completion.
⬇️ Step 2: Download CS 1.6 Server Files
In SteamCMD console, type these commands:
login anonymous force_install_dir C:\HLDS\cstrike app_update 90 validate quitWhat this does:
login anonymous– Log in without Steam accountforce_install_dir– Set installation directoryapp_update 90– Download Half-Life/CS 1.6 server (App ID 90)validate– Verify all files downloaded correctly
Download time: 5-10 minutes depending on internet speed. Server files are ~500 MB.
🚀 Step 3: Launch Your Server
Create a batch file to easily start server.
Create file: C:\HLDS\start_server.bat
@echo off hlds.exe -console -game cstrike +maxplayers 20 +map de_dust2 +sv_lan 0 pauseParameter breakdown:
- -console: Run with console window
- -game cstrike: Load Counter-Strike
- +maxplayers 20: Maximum 20 players
- +map de_dust2: Starting map
- +sv_lan 0: Internet server (not LAN only)
Double-click start_server.bat to launch!
Server is running when you see:
Connection to Steam servers successful. Public IP is XXX.XXX.XXX.XXX VAC secure mode is activated.🔧 Step 4: Test Locally
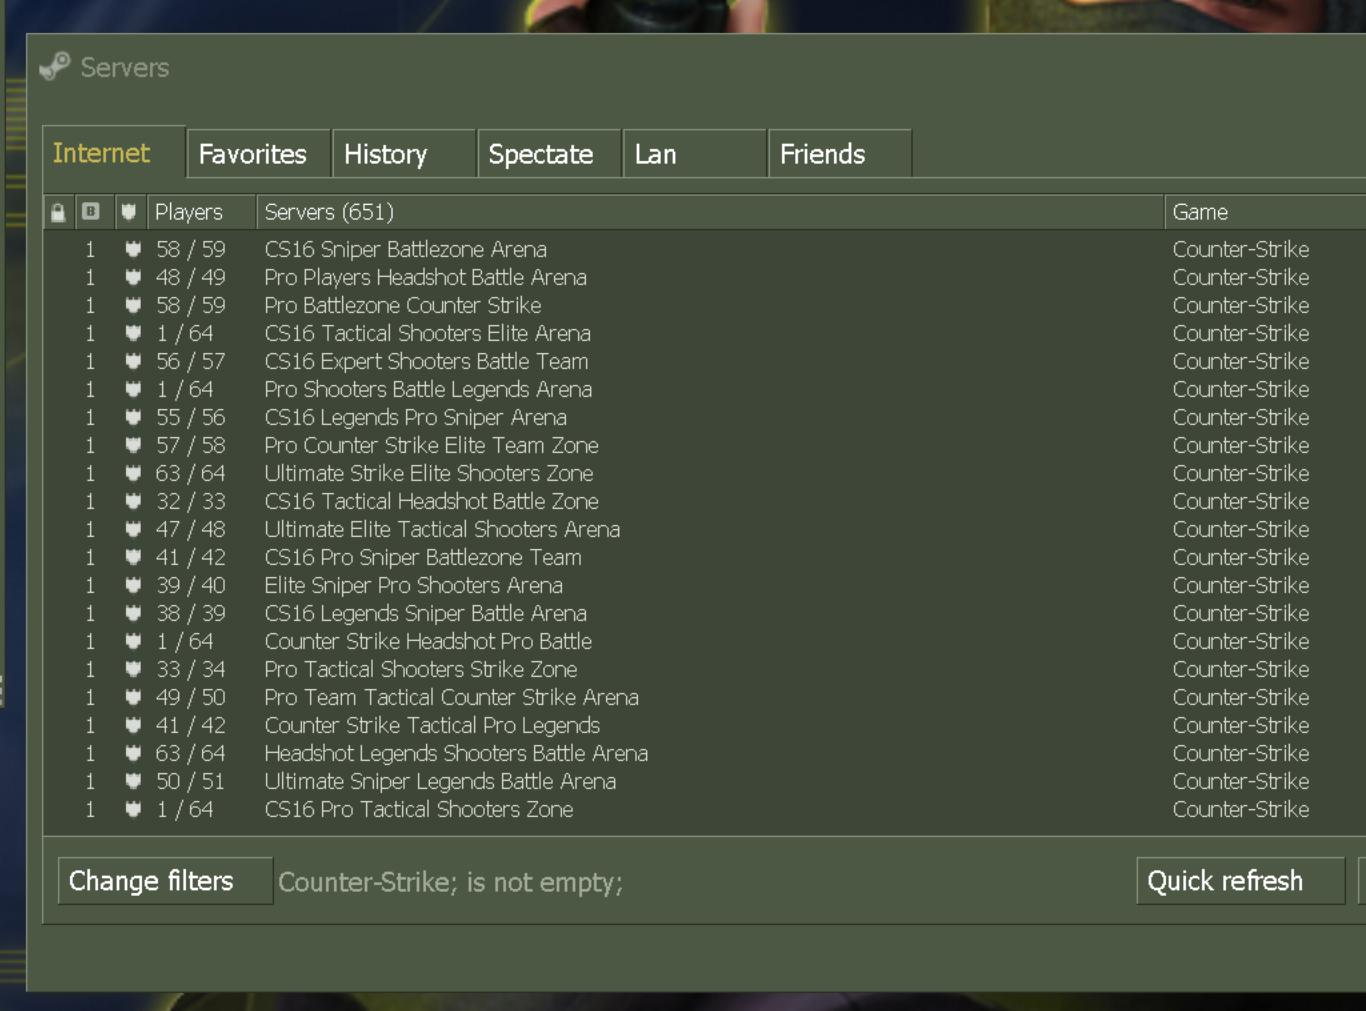
- Launch CS 1.6 client
- Find Servers → LAN
- Your server should appear
- Join and test
Can’t see server? Make sure server launched successfully. Check console for errors.
Linux Server Setup (Ubuntu/Debian)
Recommended for VPS Hosting
🐧 Step 1: Prepare System
SSH into your server and run:
# Update system sudo apt update && sudo apt upgrade -y # Install required packages sudo apt install lib32gcc1 lib32stdc++6 -y # Create user for server (don't run as root) sudo adduser hlds sudo su - hldsWhy separate user? Security. Don’t run game servers as root.
📦 Step 2: Install SteamCMD
# Create directory mkdir ~/steamcmd cd ~/steamcmd # Download and extract wget https://steamcdn-a.akamaihd.net/client/installer/steamcmd_linux.tar.gz tar -xvzf steamcmd_linux.tar.gz # Run SteamCMD (first launch updates) ./steamcmd.sh⬇️ Step 3: Download CS 1.6 Server
In SteamCMD:
login anonymous force_install_dir /home/hlds/cstrike-server app_update 90 validate quitWait for download to complete.
🚀 Step 4: Create Start Script
Create file: ~/start.sh
#!/bin/bash cd /home/hlds/cstrike-server ./hlds_run -game cstrike +maxplayers 20 +map de_dust2 +sv_lan 0Make executable:
chmod +x ~/start.shLaunch server:
./start.sh🔄 Step 5: Auto-Start with Screen
Install screen (keeps server running after SSH disconnect):
sudo apt install screen -yLaunch in screen:
screen -S csserver ./start.shDetach from screen: Press Ctrl+A then D
Reattach to screen:
screen -r csserverNow server runs even after you disconnect SSH!
Basic Server Configuration
Essential Settings
⚙️ Server.cfg Location
Windows: C:\HLDS\cstrike\cstrike\server.cfg
Linux: /home/hlds/cstrike-server/cstrike/server.cfg
If file doesn’t exist, create it.
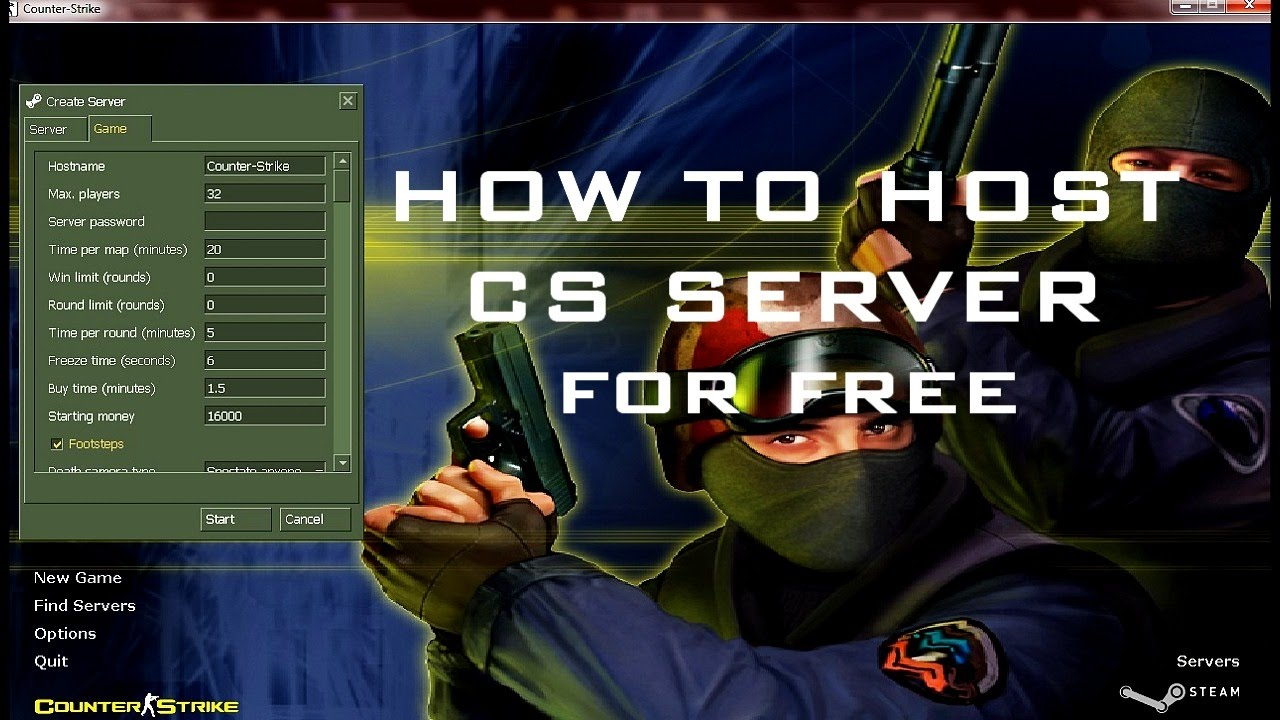
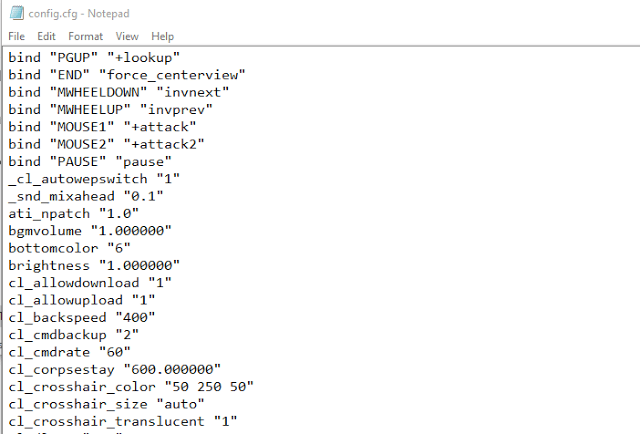
📝 Basic server.cfg Template
// Server Name hostname "My CS 1.6 Server | Dust2 Only" // RCON Password (admin control) rcon_password "your_secure_password_here" // Server Password (leave empty for public) sv_password "" // Contact Email sv_contact "admin@yourserver.com" // Region (255 = world) sv_region 255 // Server Rates sv_maxrate 25000 sv_minrate 5000 sv_maxupdaterate 101 sv_minupdaterate 10 // Gameplay Settings mp_friendlyfire 0 mp_autoteambalance 1 mp_limitteams 2 mp_autokick 0 mp_tkpunish 0 // Round Settings mp_freezetime 5 mp_roundtime 5 mp_buytime 1.5 mp_startmoney 800 mp_c4timer 45 // Competitive Settings sv_alltalk 0 mp_forcechasecam 2 mp_footsteps 1 // Logging log on sv_logbans 1 sv_logecho 1 // Map Cycle mapcyclefile mapcycle.txt // Execute on server start exec banned_user.cfg exec banned_ip.cfgSave this file and restart server to apply.
Important Settings Explained
hostname
What players see in server browser.
Make it descriptive: Include game mode, map rotation, region.
Example: "[EU] Dust2 Only 24/7 | Classic Competitive"
rcon_password
Admin password for remote control.
Use STRONG password. This gives full server control.
Never share publicly. Only give to trusted admins.
sv_maxrate / sv_minrate
Controls bandwidth per player.
25000 is standard for modern connections.
Lower if you have limited upload bandwidth.
mp_friendlyfire
0 = Can’t damage teammates (recommended for public)
1 = Can damage teammates (competitive/private servers)
mp_autoteambalance
Automatically balances teams.
1 = Enabled (recommended)
Prevents 10v2 situations.
mp_roundtime
Round time in minutes.
5 = Standard competitive
3 = Faster paced
Advanced Server Settings
Fine-Tuning Your Server
🎮 Game Mode Configs
Classic Competitive:
mp_friendlyfire 1 mp_startmoney 800 mp_roundtime 5 mp_c4timer 45 mp_buytime 1.5 mp_freezetime 5Casual Public:
mp_friendlyfire 0 mp_startmoney 16000 mp_roundtime 3 mp_buytime 0.25 mp_freezetime 2Deathmatch:
mp_respawn_on_death 1 mp_timelimit 20 mp_fraglimit 0 mp_startmoney 16000🗺️ Map Rotation (mapcycle.txt)
Location: Same folder as server.cfg
Example mapcycle.txt:
de_dust2 de_inferno de_nuke de_train de_aztec cs_office cs_italyOne map per line. Server rotates through these after each map ends.
Dust2 Only Server:
de_dust2Just list one map – it will loop.
⏰ Time Limit vs Win Limit
// Play for 30 minutes then change map mp_timelimit 30 mp_winlimit 0 // Or play until one team wins 16 rounds mp_timelimit 0 mp_winlimit 16 // Or both (whichever comes first) mp_timelimit 45 mp_winlimit 16Installing Plugins (AMX Mod X)
Extending Server Functionality
🔌 What is AMX Mod X?
AMX Mod X (AMX) is a plugin framework for Half-Life/CS 1.6 servers.
Enables:
- Admin commands (kick, ban, slap, etc.)
- Anti-cheat plugins
- Custom game modes
- Statistics tracking
- Chat commands
- Map voting
- Thousands of community plugins
Installing AMX Mod X
📥 Step-by-Step Installation
1. Download AMX Mod X
Visit: https://www.amxmodx.org/downloads.php
Download: AMX Mod X 1.10 – Base + CS Addon
2. Extract to Server Directory
Extract downloaded files to your CS 1.6 server root folder.
It will create/update folders: addons/, dlls/
3. Edit liblist.gam
Location: cstrike/liblist.gam
Find line:
gamedll "dlls\mp.dll"Change to:
gamedll "addons\metamod\dlls\metamod.dll"4. Restart Server
Restart server. AMX Mod X should load.
5. Verify Installation
Join server, open console, type:
amxx versionShould show AMX Mod X version.
Adding Admins
👤 Admin Configuration
File: addons/amxmodx/configs/users.ini
Add admin by Steam ID (recommended):
"STEAM_0:1:12345678" "" "abcdefghijklmnopqrstu" "ce"Or by name/password:
"AdminName" "password123" "abcdefghijklmnopqrstu" "ce"Access flags explained:
- a: Immunity (can’t be kicked by other admins)
- b: Reservation (can join full server)
- c: Kick/Ban commands
- d: Slay/Slap commands
- e: Map commands
- f: Cvar commands
- t: Chat admin (colored chat)
- z: Super admin (all access)
Example full admin:
"STEAM_0:1:12345678" "" "abcdefghijklmnopqrstu" "ce"Essential Plugins
🔌 Recommended Plugins
Already included with AMX Mod X:
- admincmd.amxx: Basic admin commands
- adminvote.amxx: Admin voting
- mapchooser.amxx: Map voting at end
- nextmap.amxx: Shows next map
- statscfg.amxx: Player statistics
Additional useful plugins:
- Anti-Cheat: Download from AMX forums
- Knife Mod: Knife fights at round start
- Parachute: Deploy parachute in air
- Respawn: Auto-respawn in deathmatch
- Shop: Buy special items with kills
Where to find plugins: AlliedModders AMX Forum
Adding Custom Maps
Expanding Map Pool
🗺️ Installing Custom Maps
Step 1: Download Map
Find maps at: GameBanana CS 1.6 Maps
Download .bsp file (and .wad files if included)
Step 2: Install Map Files
- .bsp file →
cstrike/maps/ - .txt file (map description) →
cstrike/maps/ - .wad files (textures) →
cstrike/orcstrike/wads/ - .nav file (bot navigation) →
cstrike/maps/
Step 3: Add to Map Rotation
Edit mapcycle.txt, add map name:
de_dust2 de_inferno aim_map_new fy_iceworldStep 4: Test Map
In server console:
changelevel aim_map_newIf map loads successfully, it’s installed correctly!
⬇️ Fast Download Setup
Problem: Players download maps slowly from your server.
Solution: HTTP/FTP fast download.
Setup with HTTP:
- Set up web server or use external hosting
- Upload maps/models/sounds to web directory
- Add to server.cfg:
sv_downloadurl "http://yourwebsite.com/cstrike" sv_allowdownload 1 sv_allowupload 1Players now download from HTTP (much faster than game protocol).
Port Forwarding & Firewall Setup
Making Your Server Accessible
🔓 Required Ports
CS 1.6 Server uses these ports:
- 27015 (UDP) – Game server
- 27020 (UDP) – SourceTV (optional)
- 26900 (UDP) – Steam connection
Forward port 27015 UDP minimum.
Port Forwarding (Home Server)
🏠 Router Configuration
Step-by-step:
- Find your local IP:
ipconfig(Windows) orifconfig(Linux) - Log into router admin panel (usually 192.168.1.1 or 192.168.0.1)
- Find “Port Forwarding” or “Virtual Servers” section
- Add new rule:
- Service Name: CS 1.6
- Port Range: 27015-27015
- Local IP: Your PC’s IP
- Protocol: UDP
- Save and apply
Test: Visit canyouseeme.org, check port 27015
Firewall Rules
🛡️ Windows Firewall
- Windows Firewall → Advanced Settings
- Inbound Rules → New Rule
- Port → UDP → 27015
- Allow connection
- Apply to all profiles
- Name: “CS 1.6 Server”
🐧 Linux Firewall (UFW)
sudo ufw allow 27015/udp sudo ufw allow 26900/udp sudo ufw enableServer Maintenance & Management
Keeping Your Server Healthy
🔄 Regular Tasks
Daily:
- Check server logs for errors
- Monitor player count/activity
- Respond to admin requests/reports
- Ban cheaters if detected
Weekly:
- Review admin actions (abuse check)
- Update plugins if needed
- Backup server configs
- Check banned_user.cfg / banned_ip.cfg
Monthly:
- Update server files via SteamCMD
- Review and optimize settings based on feedback
- Clean old logs
- Audit admin list
📊 Monitoring Tools
Built-in Commands:
status // Show connected players users // Show user count stats // Server statisticsLog Files Location:
cstrike/logs/– Game logsaddons/amxmodx/logs/– AMX logs
External Monitoring:
- GameTracker – Server listing/stats
- Discord bots – Real-time status in Discord
- HLSW (Half-Life Server Watch) – Desktop monitoring tool
🚨 Common Issues & Fixes
Server not appearing in list:
- Check
sv_lan 0in server.cfg - Verify ports forwarded correctly
- Ensure firewall allows connections
- Confirm server is running (not crashed)
High ping / lag:
- Check upload bandwidth (need 1 Mbps per 5 players minimum)
- Lower
sv_maxrate - Reduce
maxplayers - Disable resource-heavy plugins
Server crashes:
- Check logs for errors
- Disable recently added plugins (one at a time)
- Verify server files with SteamCMD
- Check for corrupt maps
Cheaters:
- Install anti-cheat plugin
- Ban by Steam ID (permanent)
- Enable VAC if using Steam
- Active admins are best anti-cheat
My Server Hosting Journey
15 Years of Lessons
2006: First Server (Home PC)
Hosted 10-player server on my Pentium 4. Invited school friends. Ran 24/7 (parents weren’t happy about electricity). Learned port forwarding, basic configs. Server was laggy but it was MINE.
2007-2009: Upgraded to VPS
Got $5/month VPS. Hosted 32-player server. Learned Linux, SSH, AMX Mod X. Built small community (20-30 regulars). Best CS 1.6 period of my life – knowing all your server’s players by name.
2010-2012: Peak Community
Server was FULL every evening. Had 5 admins, organized events, competitive matches. Learned: community management is 80% people skills, 20% technical. Dealt with drama, cheaters, toxic players.
2013-2015: CS:GO Exodus
Half my community moved to CS:GO. Server went from 32 players nightly to 10-15. Struggled to keep it active. Eventually shut down main server, kept 16-slot for old friends.
2016-Present: Private Servers
Now I host private servers for occasional LAN parties, testing, nostalgia. No public community anymore – too much time commitment. But I still know how to spin up a server in 10 minutes.
Key lessons:
- Technical setup is easy. Community management is hard.
- Active admins > anti-cheat plugins
- Simple configs > over-modded chaos
- Small tight-knit community > large anonymous pub
- VPS is worth the $5/month for 24/7 uptime
Quick Reference Commands
🎮 Server Console Commands
changelevel de_dust2 // Change map kick "PlayerName" // Kick player banid 0 STEAMID kick // Ban by Steam ID users // List players status // Detailed status restart // Restart round quit // Shut down server👤 RCON Commands (Remote)
In-game console:
rcon_password "yourpass" rcon changelevel de_dust2 rcon kick "PlayerName" rcon say "Server message" rcon statusRelated Guides
📥 Get CS 1.6
🎯 Community Building
Final Thoughts: Hosting a CS 1.6 server in 2025 is surprisingly easy and cheap. A $5/month VPS can handle a 32-player server with room to spare. The technical setup takes maybe 30 minutes following this guide – download SteamCMD, install server files, configure server.cfg, forward ports, done. The HARD part isn’t technical – it’s building and maintaining a community. After running servers for 15 years, I learned that great communities need active admins, consistent rules, and genuine care for your players. The best servers aren’t the ones with 100 plugins or custom everything – they’re the ones where players feel welcome and want to return. Whether you’re hosting for friends, building a public community, or just experimenting, CS 1.6 server hosting is a rewarding experience that teaches you Linux, networking, community management, and gives you complete control over your CS 1.6 experience.